

Hello World!
In this blog, I would like to share my experience in creating a simple battery tracker, that alerts the user when the battery level is low. For this, I have used Python and some basic Linux commands.
How did I do?
Where do I get data?
Our code is going to track the status of the battery, that is how much percentage of charge the battery currently contains. So, where can I get the data on the battery status? Let’s see.
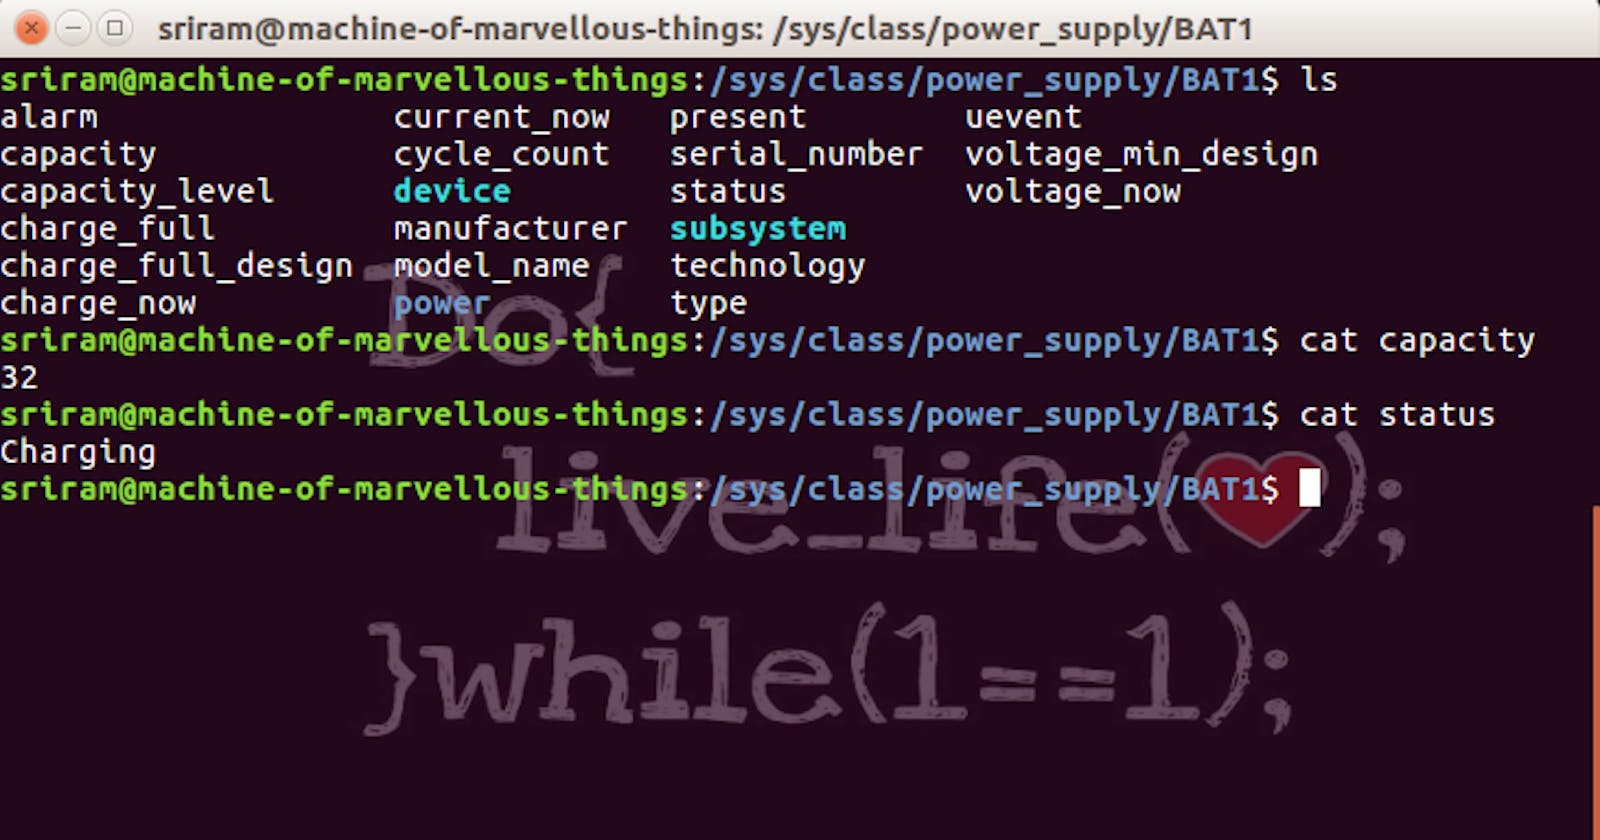
Open the terminal
Move to the directory /sys/class/power_supply/BAT1 by typing the below command
cd /sys/class/power_supply/BAT1
In some devices, the directory BAT1 maybe have a different name like BAT0.
List the files in the directory using the “ls” command. You could see some files like capacity, model_name, manufacturer, status, etc.
The two files that we require are capacity, which has the percentage of charge currently the battery has, and status, which tells us whether the battery is in the charging state or in discharging state
We can use the cat command to print the capacity and status in the terminal.
cat capacity
cat status
This will print the current charge in percentage and status in the terminal. You can refer to the below screenshot.
A screenshot of the terminal showing the charge and status of the battery
So, now we’ve got the data source. Next how to get this data in python and how to track it? Let’s see.
The Coding part
Here we are going to use python for getting the data and alert the user when the charge is low. In python, we can read the content of the file using the functions open() and readline(). The open function will open the specified file and readline function will read the file contents. For example, if we want to read the status of the battery from the status file, the code will be
charge_state = open(“/sys/class/power_supply/BAT1/status”,”r”).readline().strip()
The open function has 2 parameters. The first parameter denotes the file path and the second parameter denotes the mode. Here, in our example, we have set the mode to read(r), since we only read data from the file. The strip() function removes the trailing blank spaces from the data. As a result, the charge_state variable will hold the status of the battery. That is either of the two values, “Charging” or “Discharging”.
So now, let us get into the logic. When should we alert the user? We have to alert when the charge goes below 30% and the charger is not plugged in. The logic is:
Alert_User when capacity ≤ 30 and status==”Discharging”
Now we have found the logic, how to alert the user? The answer is the dialog box. A dialog box is nothing but a pop-up window, used to interrupt the user to display some message or prompt the user to enter any additional information. For displaying info in the dialog box, we use a python library called Tkinter. Using this library, we can create a dialog box. Below is the source code for our Battery Tracker.
#!/usr/bin/python

import Tkinter as tk
import tkMessageBox
root = tk.Tk()
root.withdraw()

def powerFunction():
current_stat=open("/sys/class/power_supply/BAT1/capacity","r").readline().strip()
return current_stat

def chargeState():
charge_state=open("/sys/class/power_supply/BAT1/status","r").readline().strip()
return charge_state
powerStat = 100
print powerStat
tkMessageBox.showinfo("Running!","Battry Status Tracker is now running on machine")
while int(powerStat)>=30:
powerStat = powerFunction()
chargeStat = chargeState()
print "Battery Tracking"
if int(powerStat)<=30 and chargeStat == "Discharging":
tkMessageBox.showwarning("Alert!","Battery Low!\nCharging Required!\nYour Battery Status:"+powerStat+"% ("+chargeStat+")")
break
We can save this code with the .py extension anywhere in the system, let’s say Desktop. I have now saved the python file with the file name power.py on the desktop. Now we have to run this python file. How to do that? Let’s see
Open the terminal
Move to the directory, where the python file is saved. In my case, it is the Desktop. So I’m moving to the Desktop using the cd command.
cd Desktop
There are two versions of python namely Python 2.X and Python 3.X. The above code is written in python 2. The command to run python 2 files is python <Filename.py>. If it is in the case of python 3, then the command is python3 <Filename.py>. Since our code is written in python 2, the command to execute is
python power.py
This will start executing our python code in the terminal.
What next?
Now the code is ready. But whenever we turn on our computer, we have to open the terminal and move to the desktop and execute the python file. The terminal will also keep on running until the charge comes down to 30%. This is quite annoying, right? To avoid these steps, we can create a ‘Desktop Entry’, that will allow us to run the python code with just a double click.
Desktop Entry
The Desktop Entry is nothing but a desktop shortcut, created for easy access to files/executables. Let us see how to create a desktop entry in Linux.
Open any editor (like Gedit).
Copy-paste the below code.
[Desktop Entry]
Type=Application
Exec=python /home/sriram/Desktop/power.py
Icon=/home/sriram/Desktop/Desktop_sub/battery.png
Name=Power Tracker
Terminal=false
Here, ‘Exec’ holds the command that we type in the terminal to execute the python code. ‘Icon’ holds an image file path, that is to be set as an icon for our desktop entry. ‘Name’ holds the name for our desktop entry, which is the name displayed on the screen. In ‘Terminal’ we can decide on whether to show the terminal while executing. As I said earlier, it will be annoying if we show the terminal. So I have set this to false so that the code runs in the background. Now we can save this file with the ‘.desktop’ extension.

This is how the desktop entry will look like.
Now, to make our desktop entry execute our python code with a double click, we need to do one more thing. Right-click on our desktop entry, and properties and move to the ‘Permissions’ tab. Check the Allow executing file as a program checkbox. This will make our desktop entry an executable.
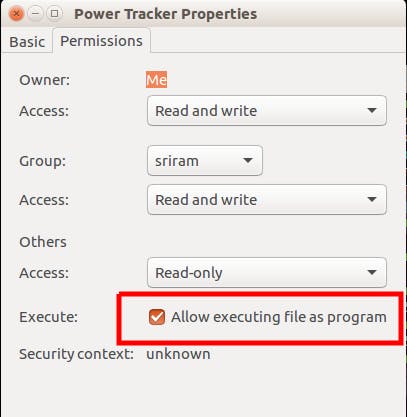
Making the desktop entry executable
Now let’s run the “Power Tracker”, by just double-clicking on it. A dialog box will appear to acknowledge that the Power Tracker is running. Once the battery reaches 30% charge and is not plugged in for charging, the Alert dialog box will appear with a warning message. This is how it works.
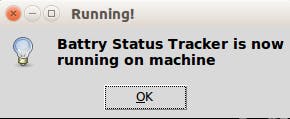
Dialog box to acknowledge user that the code is running
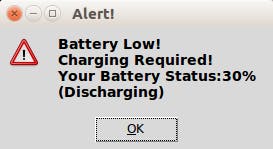
The alert dialog box, when the battery level comes down to 30%
This works only with machines running the Linux operating system. Feel free to try this out on your machines. Looking forward to your valuable feedback and suggestions.
Thank you!