

Hello World!
In the previous part, we've seen how we can query for the RSS feed and how we can convert it to JSON format. If you have not read it, I'd recommend you to have a look at it.
In this part, we will be seeing how we can use the JSON we retrieved from RSS to display the blogs on my website.
Note: This part would require a basic understanding of React. If you do not have much exposure to react, it is recommended to know some basics of React before proceeding with this article.
Changes to the server code from Part 1
I've made a few changes to the code which we wrote in the previous part. Along with the Hashnode post, now I'm pulling the Medium posts as well in a similar way. Below is the new code:
app.get('/blogs', async(req, res) => {
  try {
  let blogs;
  // Getting the Hashnode posts
  const hashnode = await parser.parseURL(process.env.HASHNODE_FEEDS)
  // Adding a new field to the response called "medium", to identify which medium the post is published (Hashnode or Medium).
  hashnode.items.forEach(item => {
    item.medium = "hashnode"
  })

  // Getting the Medium posts
  const medium = await parser.parseURL(process.env.MEDIUM_FEEDS)
  medium.items.forEach(item => {
    item.medium = "medium"
  })

  // Consolidating both the posts
  blogs = [...medium.items, ...hashnode.items]
  // Sorting the posts in reverse chronological order (descending order of date)
  blogs = _.orderBy(blogs, ['isoDate'], ['desc'])
  res.status(200).send(blogs)
} catch(err) {
  res.send(err)
}
})
Now we are getting posts from both Hashnode and Medium
I've deployed the server in a hosting service so that we can communicate with it from the front end.
Fetch posts in the Front End
We are done with the server part. Now let's see how to fetch the posts in the UI application from the server. I've created a new react app with the create-react-app.
Let's install the following dependencies:
Axios - Used to fetch data from the backend.
Moment - NPM package which we would be using for formatting time.
SASS - CSS pre-processor
yarn add axios moment sass
Create axios.jsx file to create an instance of Axios, which we would be using to communicate with the server.
// FILE: axios.jsx

import axios from "axios";

const callApi = axios.create({
    baseURL: process.env.SERVER_URL,
  });

export default callApi
Now, let's fetch the posts from the server. Create a new component for blogs in blogs.jsx and add the below code
// FILE: blogs.jsx

import React, { useEffect, useState } from "react";
import callApi from "../axios/axios";

export default function Blogs() {
  // would be called when component mounts
  useEffect(() => {
    fetchData();
  }, []);
  // State to store blogs
  const [blogs, setBlogs] = useState();
  // Function to retrieve data from server
  const fetchData = async () => {
    callApi.get('/blogs').then(feeds => {
      feeds && feeds.data && setBlogs(feeds.data)
    })
  }
  return (
    <h1>Hello World!</h1>
  )
}
The above code would fetch the blog posts and would store them in the blogs state.
Let's change the App.js file to show our Blogs component instead of its default content.
// FILE: App.js

import Blogs from "./components/Blogs/blogs";
export default function App() {
    return (
        <div className="main-container">
            <Blogs />
        </div>
    );
}
Now, if we run the app with yarn start , we will see just a heading with the text "Hello World!"
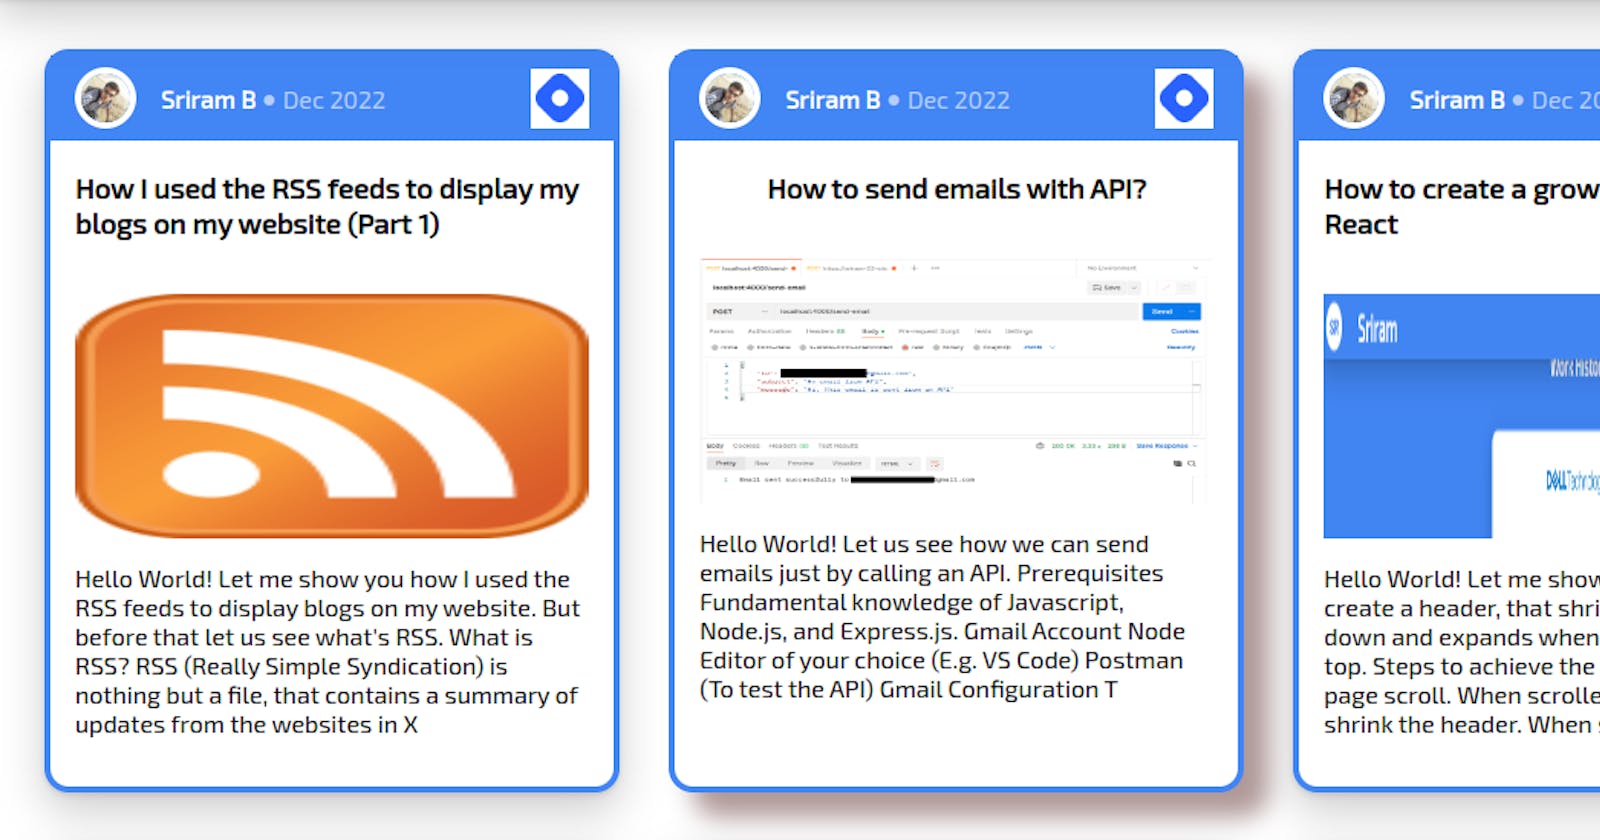
Display blog posts
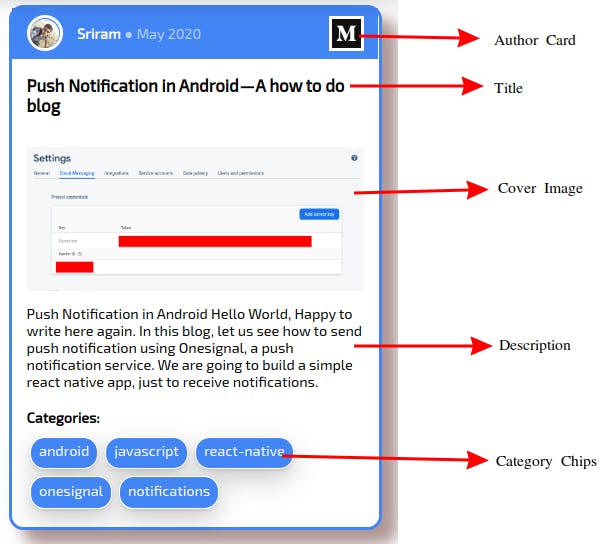
Let us create some cards to display our blogs in the react app. We will create three other components called Author Card , Blog Card and Category Chip. The blog card contains the Author card and details like the cover image, blog title, and description. The author card has the following details Author name with the avatar, time when published and the origin of the blog (Medium or Hashnode). The category chip would show the categories the post belongs to in a chip component. We will get categories for Medium blogs. Below is the code for all three components.
// FILE: blogs.jsx

import React, { useEffect, useState } from "react";
import "./blogs.scss";
import BlogCard from "./blogCard";
import callApi from "../axios/axios";
export default function Blogs() {
  // Fires as soon as the component is mounted
  useEffect(() => {
    fetchData();
  }, []);
  // State to store the blog data
  const [blogs, setBlogs] = useState();
  // Function to fetch blog data
  const fetchData = async () => {
    callApi.get('/blogs').then(feeds => {
      feeds && feeds.data && setBlogs(feeds.data)
    })
  }
  return (
    <section className="blogs-section">
      <h2>Blogs</h2>
      <div className="blog-container">
          <!-- Checks if blog data is there and renders blog card -->
          {blogs && blogs.map(blog => (
            <BlogCard blog={blog} src={blog.medium}></BlogCard>
          ))}
      </div>
      <!-- Added buttons to Medium and Hashnode sites -->
      <div className="blog-button-container">
        <span className="medium-button"><a href="https://medium.com/@yourUserName"><button>Check more in Medium</button></a></span>
        <span className="hashnode-button"><a href="https://yourname.hashnode.dev"><button>Check more in Hashnode</button></a></span>
      </div>
    </section>
  );
}
// FILE: blogCard.jsx
import AuthorCard from "./authorCard";
import "./blogs.scss";
import CategoryChip from "./categoryChip";
const BlogCard = ({ blog, src }) => {
// This will hold the link for placeholder image with the blog title
const PLACEHOLDER = `https://via.placeholder.com/900/4285f4/ffffff/500x200.png?text=${blog.title}`
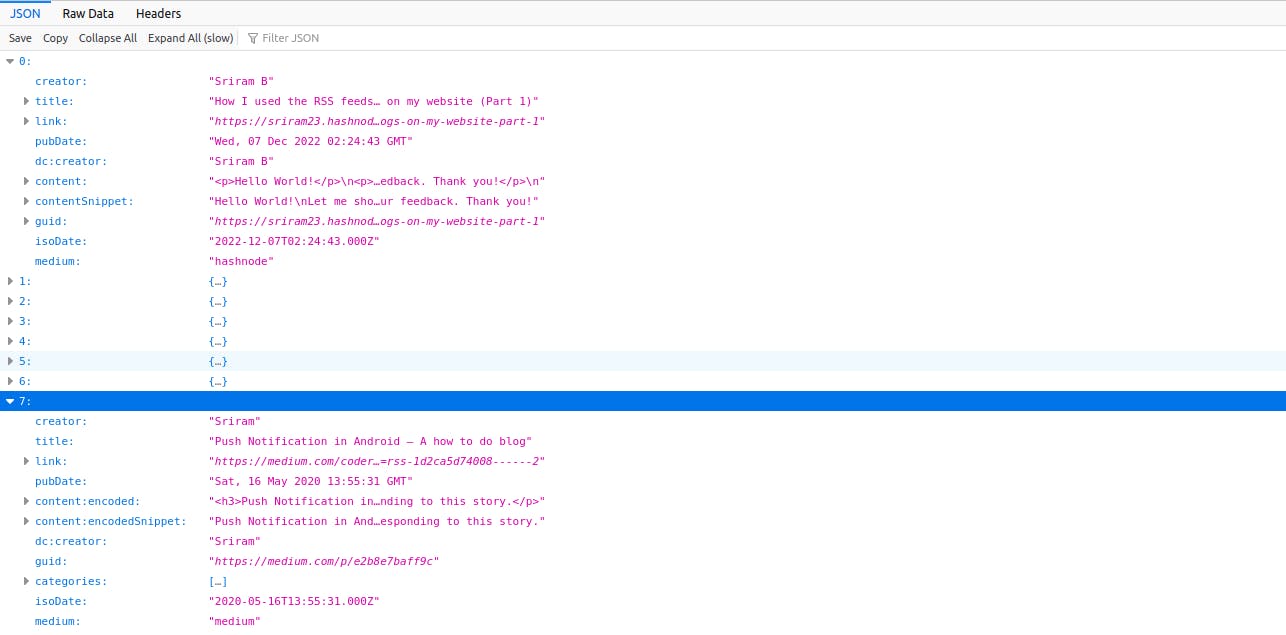
/**
We have a case where the cover images are not being shown in the converted JSON. So in order to show the first available image in the post, following the below strategy.
*/
// Function to extract the first available image in the post
const splitImage = (text) => {
// Splitting with ' " ' since the links are inside " "
const links = text && text.split("\"")
// Checking for image extension inside the string
return links && links.length && links.find(txt => txt.includes(".png") || txt.includes(".jpg") || txt.includes(".svg") || txt.includes(".jpeg") || txt.includes(".gif")) || null;
}
return(
<a href={blog.link} className="blog-card" target="_blank">
<AuthorCard
author={blog.creator}
time={blog.isoDate}
src={src}
></AuthorCard>
<h3>{blog.title}</h3>
<figure className="thumbnail">
<!-- Checking if image is available in "content:encoded" or "content" else showing placeholder -->
<img src={splitImage(blog["content:encoded"]) || splitImage(blog["content"]) || PLACEHOLDER} alt="Thumbnail" />
</figure>
<!-- Showing the desc, which is the blog content sliced to 250 characters -->
<span>
{(blog["content:encodedSnippet"] &&
blog["content:encodedSnippet"].slice(0, 250)) ||
(blog["contentSnippet"] && blog["contentSnippet"].slice(0, 250))}
</span>
<!-- Showing the categories in a chip component -->
<span className="category-section">
{blog.categories && <strong>Categories:</strong>}{" "}
<span className="category-container">
{blog.categories &&
blog.categories.map((category) => (
<CategoryChip category={category}></CategoryChip>
))}
</span>
</span>
</a>
)};
export default BlogCard;
// FILE: authorCard.jsx

import moment from "moment";
import "./blogs.scss"
// Hardcoding the avatar for now. Replace with your image link
const DP = process.env.AVATAR;
// Array to map the month
const MONTH = ["Jan", "Feb", "Mar", "Apr", "May", "Jun", "Jul", "Aug", "Sep", "Oct", "Nov", "Dec"];
// Link for Medium and hashnode links (Replace the placeholder values)
const MEDIUM = process.env.MEDIUM_LOGO
const HASH_NODE = process.env.HASHNODE_LOGO
const AuthorCard = ({author, time, src}) => (
<div className="author-card">
    <div className="author-section">
        <figure className="author-image">
            <img src={DP} alt="Author Image" />
        </figure>
        <span className="author-name">{author}</span>
        <span className="seperator">{'\u25CF'}</span>
        <!-- Converting iso date to MMM YYYY format -->
        <span className="time">{MONTH[moment(time).month()]} {moment(time).year()}</span>
    </div>
    <!-- Medium or Hashnode icon -->
    <figure   figure className="blog-icon">
        <img src={src==='medium'? MEDIUM : HASH_NODE} alt="Blog Logo" />
    </figure>
</div>
)
export default AuthorCard;
// FILE: categoryChip.jsx

import "./blogs.scss"
const CategoryChip = ({category}) => (
<div className="chip">
    <span>{category}</span>
</div>
)
export default CategoryChip
Below is the SCSS file for the above components.
.blogs-section {
  padding: 1rem;
  display: flex;
  flex-direction: column;
  align-items: center;
  flex: 1;
  .blog-container {
    display: flex;
    justify-content: flex-start;
    flex-wrap: wrap;
    .blog-card {
      cursor: pointer;
      border: .25rem solid #4285f4;
      background: white;
      border-radius: 1rem;
      display: flex;
      flex-direction: column;
      align-items: center;
      box-shadow: rgba(0, 0, 0, 0.2) 0px 12px 28px 0px, rgba(0, 0, 0, 0.1) 0px 2px 4px 0px, rgba(255, 255, 255, 0.05) 0px 0px 0px 1px inset;
      margin: 1rem;
      padding: 0 1rem 1rem 1rem;
      width: 27%;
      text-decoration: none;
      color: black;
      .author-card, .category-section, .blog-card-title {
        padding-left: 1rem;
        padding-right: 1rem;
        width: 100%;
      }
      @media screen and (max-width: 1024px) {
        width: 40%;
      }
      @media screen and (max-width: 587px) {
        width: 80vw;
      }
      .category-section {
        margin-top: 1rem;
        width: 100%;
        strong {
          line-height: 2rem;
        }
        .category-container {
          display: flex;
          flex-wrap: wrap;
          flex: 1;
        }
      }
      .thumbnail {
        width: 100%;
        height: 10rem;
        img {
          width:100%;
          height: 100%;
        }
      }
    }
    .blog-card:hover {
      box-shadow: 1rem 1rem 1rem 0 rgba(122, 82, 82, 0.6);
    }
  }
  .blog-button-container {
    a{
      text-decoration: none;
    }
    .medium-button, .hashnode-button {
      button {
        color: #ffffff;
        border: none;
        height: 3rem;
        padding: 0.5rem;
        border-radius: 1rem;
        margin: 0.5rem;
        cursor: pointer;
      }
    }
    .medium-button {
      button{
        background: #000000;
      }
    }
    .hashnode-button {
      button {
        background: #4285f4;
      }
    }
  }
}

.chip {
  border: 2px solid #ffffff;
  border-radius: 1rem;
  padding: 0.25rem 0.5rem;
  margin: 0.25rem;
  text-align: center;
  background: #4285f4;
  color: #ffffff;
  height: 1.5rem;
  white-space: nowrap;
  box-shadow: rgba(0, 0, 0, 0.2) 0px 12px 28px 0px, rgba(0, 0, 0, 0.1) 0px 2px 4px 0px, rgba(255, 255, 255, 0.05) 0px 0px 0px 1px inset;
}

.author-card {
  width: 100%;
  display: flex;
  justify-content: space-between;
  align-items: center;
  background: #4285f4;

  .author-section {
    display: flex;
    justify-content: flex-start;
    align-items: center;
    padding: 0.5rem 0;
    .author-image {
      width: 2rem;
      margin: unset;
      border: 0.25rem solid #ffffff;
      border-radius: 50%;
      margin-right: 1rem;
      img {
        width: 100%;
        border-radius: 50%;
      }
    }
    .author-name {
      font-weight: bold;
      color: #ffffff;
    }
    .seperator {
      margin: 0.25rem;
      color: #ffffff99;
    }
  }
  .blog-icon {
    max-width: 2rem;
    padding: 0.2rem;
    margin: unset;
    background: #ffffff;
    img {
      width: 100%;
    }
  }
  .time {
    color: #ffffff99;
  }
}
A typical blog card would look like this:
Now the final application would be like this:
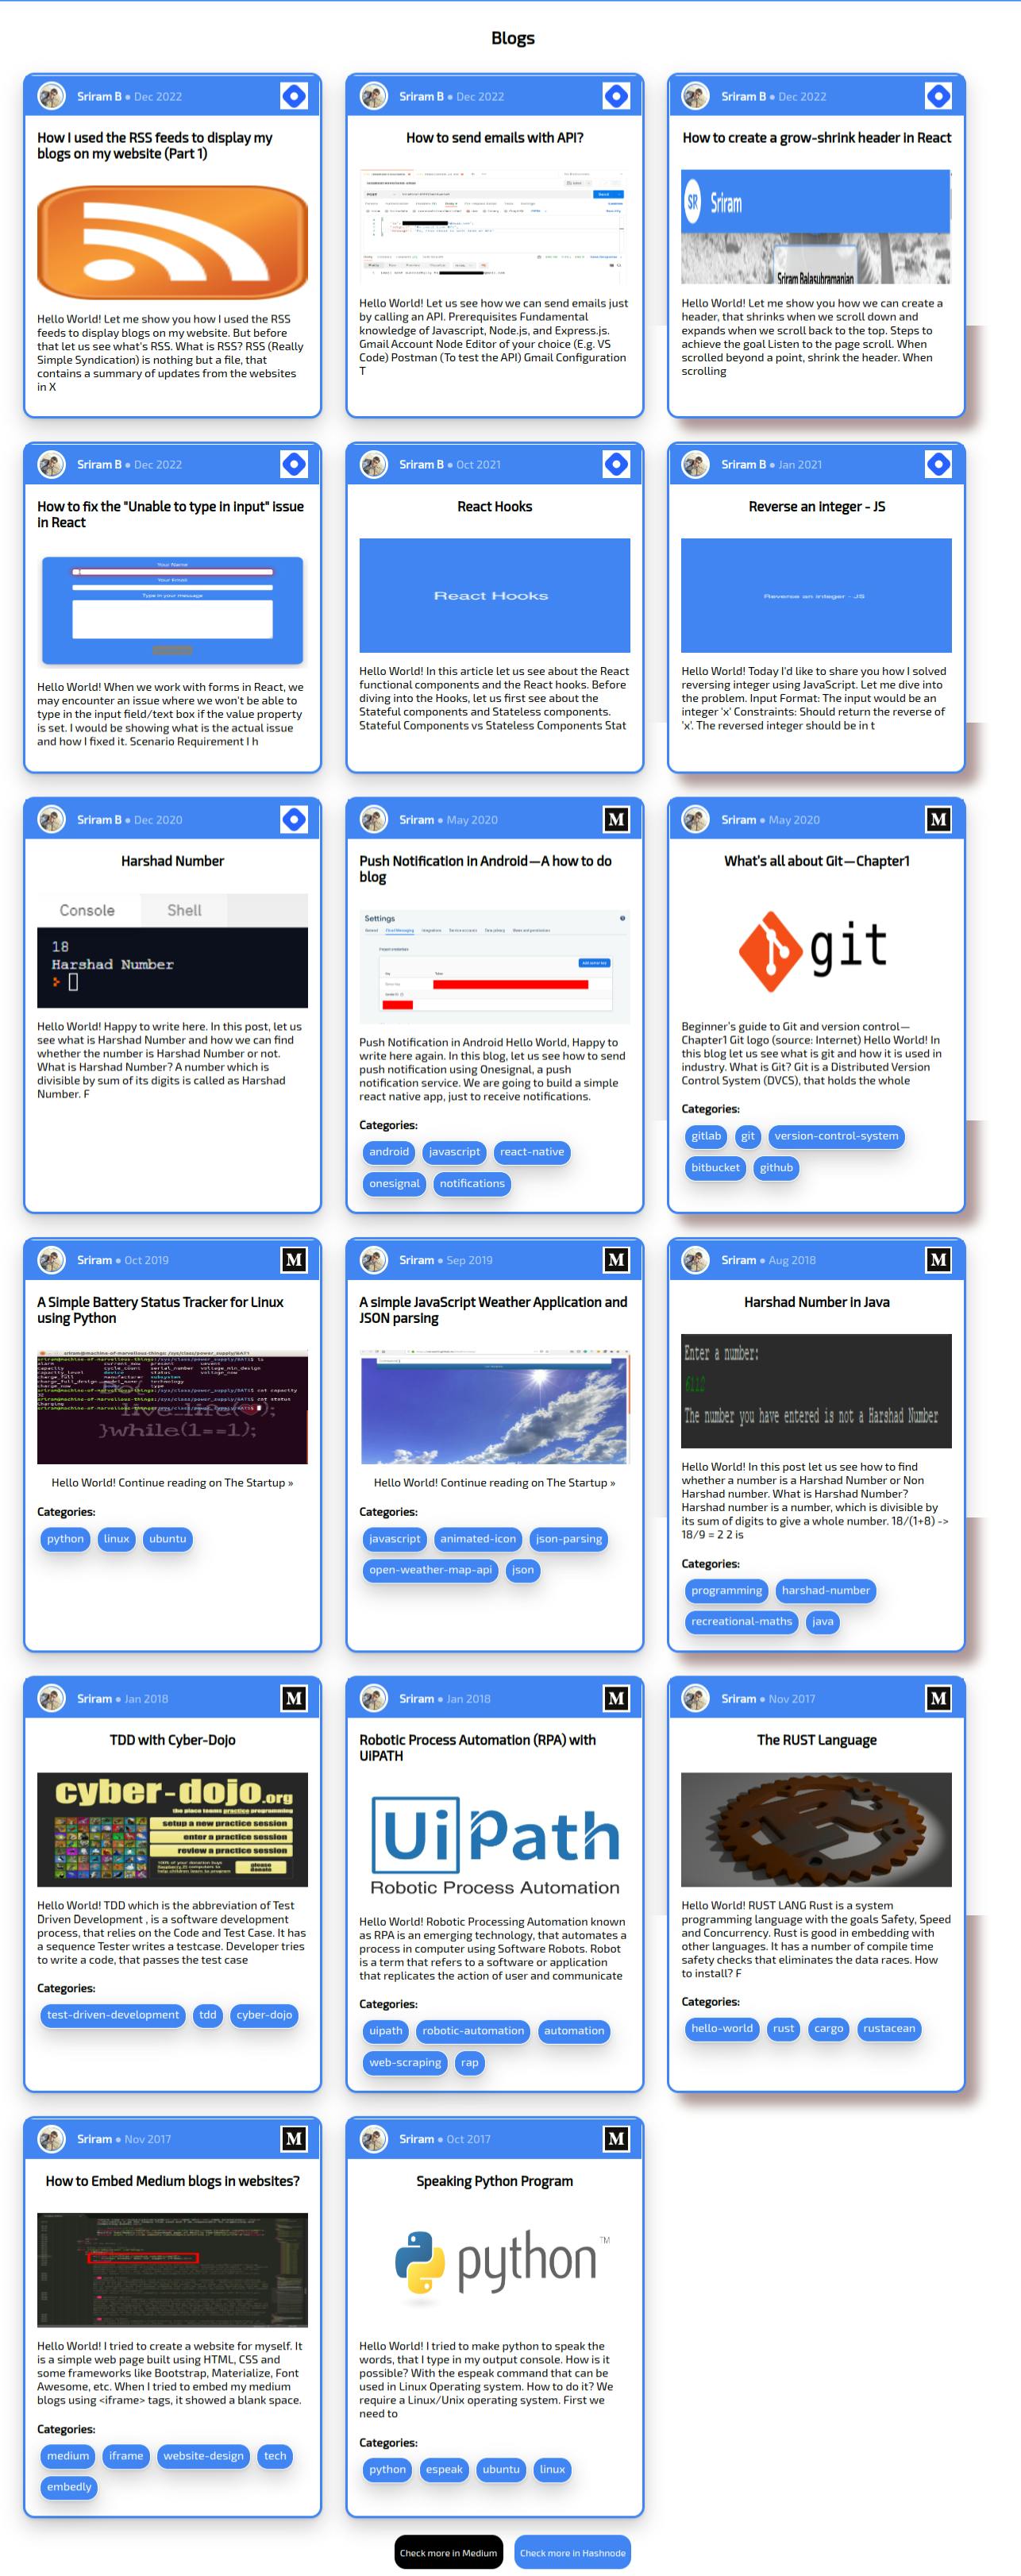
That's it, we are done with showing the blogs on our website retrieved from RSS feeds. Hope this is useful to you. Looking forward to your suggestions and feedback. Thank you!